Friday, July 31, 2009

Phone, and cleaning

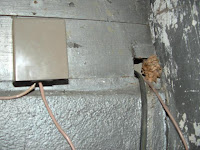
The landline was turned on today (to the carriage house) and, of course, the wire needed a little work. And it turned out that:
  • Two wires had come loose in the inside terminal box
  • The terminal box itself predated the new wiring, and so its cover could not be removed until I unstapled the arm-thick 50A-rated 6-3 cable to the stove and moved it out of the way
  • Where the phone line (and an old cable wire) enter the carriage house, there is an inch-wide gaping hole to the outside with no attempt to insulate or seal.

So it was par for the course. I moved the inside terminal box (shown in the photo in its new position), restripped and fastened the phone wires, restapled the stove cable, and vowed to visit that wire entry on my Big Sealing Project later this month.

Cleaning: the last of the major carriage house cleaning is now complete, after today's marathon push to finish the mopping of the ceiling and walls in the front room. I still don't really want to know what process could have scattered organic material so thoroughly and with such even distribution onto the walls and ceilings here; I am merely grateful that it comes off this excellent enamel paint so easily.

So. Progress today, however slight.

Tuesday, July 28, 2009

Updated plan

Fourth post today: I know the planning posts are less fun, but for me they're the most useful, because they're my actual to-do lists I'm working from. The carriage house livability point is still the focus, although we're moving in on the big house, too, at this point (the books are living there, after all, and the WiFi access point).

  1. Carriage house livability

    • Garage area livability
      • Remove superfluous fiberglass insulation from the ceiling and around heating ducts (we're going to heat the garage area, after all; we're living in it)
      • Drywall the south wall where the garage door used to be
      • Caulk everywhere, the previous owners had no idea about winterizing, it drives me berzerk, there's daylight all over the place
      • Some plaster patching where it'll do some good
      • More paint

    • Bathroom
      • Attach and plumb vanity
      • Touch up paint on walls and paint the trim

    • Windows
      • Front windows
      • Remaining two 28"x54" (kitchen and bathroom)
      • Trim on bedroom window and window 2

    • Cleaning
      • Finish mopping ceiling and walls in front room


  2. Big house

    • Some more plumbing, perhaps the upstairs bathrooms
    • Cleaning
    • Winterization, a lengthy process
    • Heat

That's a pretty truncated big house list, but it's all still vague and just looming on the horizon.

Book storage

So here's the first actual use of the big house for anything: the books are in the parlor. I'm telling people that we have a 760 square foot apartment with roughly 8000 square feet of storage.

South side yard, before and after


The yard cleanup crew has moved beyond the back yard between the buildings, and is now encroaching on the main house. I don't have a really good before picture, but my picture of the south side from May shows a little of the now-absent disorder.

The lumber is from the remains of a dog fence that I took out yesterday. I started unscrewing the 2x4 cross-pieces, and the whole neighborhood ended up helping rip out the 4x4 posts. They were all pretty excited yesterday; the alligator that lives across the street had escaped and everybody got on the news.


Laundry!

Success! My $50 Craigslist washer/dryer set is functioning perfectly (well, the dryer is really loud due to what sounds like a wobbly bearing, but it's functional, and whaddaya want for twenty-five bucks??).

This was the first actual improvement I've made so far. Everything else has just been refurbishment, i.e. replacing broken bits and cleaning. This is new functionality. It makes me inordinately proud.

Sunday, July 26, 2009

Washer hookup functional!

The dryer outlet's circuit breaker isn't installed yet (because I bought the wrong type of circuit breaker; they all look the same but are subtly different, and there are at least three types; mine are Square-D) - but other than that, the washer and dryer hookups are a go!

I glued the drain yesterday, then installed the trap for the utility sink this morning, and then the Building Muse took over and I cut and glued the entire plumbing to the washer hookup in one session lasting about four hours, time I really hadn't intended to spend on building today. Also, I had to visit Menard's because I ran out of 3/4" CPVC elbows (just one freaking elbow) - but as I had to return the circuit breaker and get the right one, that means I don't have to go tomorrow to get the dryer finished, so it all evens out in the end.

At 7 PM, after returning from a short hike with the kids and dog, I turned the water back on, and discovered only one leak - and that one not in a glued joint; I'm on a 100% roll on glued joints so far. The leak was in my homemade washer hookup.

I'm really pretty proud of this, even though it looks like a school project. I just bought the shutoff valves, drilled two holes in a bit of 2x4, and screwed the CPVC connectors onto the other side. The only problem was that the stem of the valve was juuust too short to make that final turn on the cold valve, and when I turned the water back on, it leaked copiously. So I scraped off a little wood on the bottom of the 2x4, and tightened the valve one more turn, and it was fine, crisis averted.

The only fly in this ointment is what my pictures haven't shown you yet: for some reason, there is a large hole in the floor around the drain stack, leaving me no easy way to put my washer and dryer there. I'm going to put some plywood there for now, but obviously at some point I'm going to want to fill in that hole and put concrete over it.

Saturday, July 25, 2009

Dryer vent

On the carriage house livability list, things are moving along, with the successful installation of the dryer vent today (along with gluing of the drain and installation of my washer hookup - not plumbed yet, but installed).

How to install a dryer vent:

1. Cut a hole in the wall where you want the vent. Check.

2. Drill through the other side of the wall, then go outside to find out where your hole is.

3. Fail to find hole.

4. Drill a hole from the outside at the measured point you expect the inside hole to be. Go inside to check where you came out.

5. Fail to find hole.

6. After much headscratching, realize that the wall is two layers thick - remember how the carriage house was built in 1909 of brick? And how its walls are therefore about a foot thick? The structure of this wooden wall, which replaced a garage-door thing, is plywood - insulation - more plywood - more insulation - third layer of plywood.

7. Go to Menards and buy a keyhole saw to cut out the hole in the middle layer of plywood.

8. Discover that the studs on the two layers don't line up. Now what are the odds that the more-or-less random spot I chose for my dryer vent should be precisely centered on a stud on the other side? See the hole I drilled?

9. Cut another damn hole three inches to the right. Plan to buy a little cover panel for this one.

10. Success! I can finally drill a hole from the outside that I can see on the inside. So cut out the hole on the outside.

11. Don't forget to lay a bead of caulk under the vent hood on the outside before fastening it to the wall.

12. Bask in the glory of your finished dryer vent!

Drainage revisited

Remember back in June, when I posted about the window wells leaking in the basement in the big house? Well, today we had some serious rain, and I put on a poncho and investigated; really, to understand your drainage, you need to see things while it's raining.

Here's the window well on the south side of the east end of the basement, the worst leak. The rain is falling from the (gutterless) roof down about 25 feet to the ground. The eaves are very wide, but still, a big puddle has built up here and - since the yard is badly graded and humps up from the house in this area, the water has only one place to go: into the window well, which has obviously suffered from this problem for so long that erosion is visible on the inside wall.

On the north side of the east end, we have the porch, and this inexplicable well-like ventilation opening. It's not a window, but it's ten feet north of what used to be one - and as you see, the porch roof simply drains into it, and thence, into the basement. Here, for now, I can just get a window well cover. It'll look stupid on the north side of a porch, but until I get gutters up, what choice do I have?

Back on the south side, though, I can do something right now: grabbing my trusty shovel, I start digging, pouring rain and all. Like drainage inspection, drainage ditchdigging is also best done while the rain is still falling - the water will show you exactly how well your ditch is sloped. Once you've got a good ditch laid out, you can go back during dry weather, dig deeper, put in a pipe and gravel, and cover it back up.

(Yes, I've done this before. It's amazing how often one sees bad drainage situations. With mold allergies in the family, though, one is inspired to take the bull by the horns and act.)

Presto: no more puddle. Easy!


Returning from my ditchdigging, here's what I found on the south side of the west end of the house (the more recent part of the house, sans basement). Now I know why the back rooms smell musty after a rain. Definitely a clear and pressing need for gutters. Here, unlike the 25-feet-up main part of the house, I will probably install my own gutters. For the tall part, I'm calling somebody who doesn't mind working with long ladders.

I should note: the house had gutters - box gutters. Unfortunately, it had fifty years of minimal "maintenance" by people who didn't know how box gutters are supposed to work, with the result that structurally, they're still there - but the new roofing is actually constructed over the gutters, because from the top, it was impossible to see them as gutters. They're topped with tin and tar, presumably because they were rotting.

Also, some are still rotting. But, just as junk tossed into the ocean becomes a habitat for marine life, so does junk tossed onto a house become a habitat. All part of that circle of life thing.

I informed the house's last remaining tenant that I would be evicting him as soon as I could get to it.

Never fear, though! The house does have about thirty feet of working gutter, above the sunrooms. Unfortunately, this is the downspout.

Sigh. So on drainage: Michael 1, The House about 20.
Thursday, July 23, 2009

Washer outlet live

Photographic evidence that I'm still capable of wiring a simple outlet. It's been a looong time since I reconfigured house wiring (since high school, actually, so about 25 years). It's pretty much the same, except wiring caps make things easier - and safer - than tape.

I took the outlet off the geometrically most convenient circuit; turns out this circuit is the front room outlets, at least (because when I turn it on, I hear the printer start upstairs).

I also got the dryer outlet wired, of which I will simply say right now that 8/3 wiring is really stiff. When it's working, I'll post pictures of the whole process. It's stymied right now because I forgot to bring wire staples, and I don't want to work with this cable without it being nailed solidly in place. 240V scares me a little. Not like getting on ladders, but certainly enough to instill a healthy dose of respect.

Wednesday, July 22, 2009

Outlet for washer, and drain

Today it was back to work on the house, after dealing with the crushing misunderestimated overwork, then household matters that had waited.

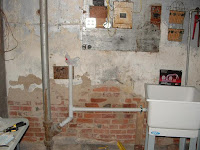
Here, we see the drain for the washer, the utility sink, and a very shiny new outlet that is not yet connected - wired, but not hot yet.

I'm pretty proud of the outlet. It looks very solid.

With the drain, I got lucky. When they built the carriage house in or around 1901 (really! It shows up on the insurance company's map for 1901!) it was all the rage to include an outhouse for the gardener, apparently. At any rate, on the other side of this wall is what's left of a urinal, and on this side of the wall, I have a convenient Y for my washer and utility sink drains. (Otherwise I wouldn't have considered putting them here.)

The only problem is that the existing fittings, being iron, are impossible to move. I even got a bigger pipe wrench and jumped on it - the only thing that happened is that the entire drain stack moved, but not the fitting. Rather than snap things off the drain stack, I tried Plan B - turns out the insert of a 1-1/2" drain trap fits into that fitting pretty well. So my drains are 1-1/2" PVC, and the insert sticks into the cast iron drain, and everything works out pretty well. Once it's all solidly installed, I'll caulk around the seal to keep the noxious fumes out.

Not too shabby for a day's work.

Friday, July 17, 2009

Back yard, before and after


The top photo is the one my sister took the day we closed, in March. The bottom one is one I just took right now from the same spot. My kids have done most of this work you see here. We took out several bushes (and now I wish I'd taken an intermediate picture with the leaves on the bushes), pruned the lovely Japanese maple, and raked all the crap out of the dirt. Now we'll seed some nice grass and there we go!

About those front windows...

I've been quiet! I had a crushingly underestimated job, which is good I guess - I'll be able to hire some people to do the two still-leaking sections of the roof on the big house. Also, a need for orthodontia is making itself known among our younger generation. These things never cease. But I still hate running three days past deadline and not actually knowing how long it'll take to finish up.

But we're here to talk about my house, right?

It turns out that somehow, despite repeated (and confirmed) measurement, the front windows for the carriage house were simply 1/8" too big for the frame, a situation which I still can't rationally explain. Reasoning, however, that taking the inside sill plate off would allow me to insert the windows straight in, instead of tilting them, I took the plate off -- and they were still too big.

Then my dad came over on Wednesday. I had been up until 4:30 AM working on some Italian quality control procedures for Alcoa (I earn the money with technical translation, if you were wondering) and so I was none too coherent, but we fixed the bathtub drain, which I'll post about separately, and I showed him the front windows.

Well. As we remember from the bathroom episode, my dad likes a challenge, and his creativity is only helped by the fact that here, he doesn't have to clean up after destroying things. It's liberating to watch him. The upshot: the windows don't actually have sills any more; we're going to have to come up with something different, like a really skinny sill or possibly a thinner plank across the top to make room for a thicker sill down below. Ah well.

At least I can get some air and light into the front room now. These look pretty decent, don't they? Better than the plywood, anyway - they're just tacked in place right now until we can replace the sills, though.

The neat thing is that the upper sash on the left side still had its counterweights intact! Sixty-year-old knotted ropes and all. I figure this was only possible because it was painted shut and therefore hadn't been moved in a very long time.

Also, fun fact: the spacing for the sill consists of chunks of brick simply laid in place to support the sill where the builder wanted it. I didn't take pictures yet, and don't want to take the window out just now to show you, but I found that pretty cool.

Thursday, July 9, 2009

Current plan, then

So now that the tub surround is done, my carriage house list looks like this:
  1. Carriage house livability

    • Bathroom
      • Attach and plumb vanity
      • Touch up paint on walls and paint the trim

    • Windows
      • Front windows
      • Remaining two 28"x54" (kitchen and bathroom)
      • Trim on bedroom window and window 2

    • Hook up washer and dryer

      • Plumb the hot and cold over to the laundry area
      • Drain
      • Electrical work: one 110 outlet for the washer, one 220 for the dryer
      • Take a dryer vent through the wall to the outside
      • Put in a utility sink, too, as long as there's plumbing going on

    • Cleaning
      • Finish mopping ceiling and walls in bedroom and front room

    • Paint all external trim

Looking a little more doable. Which is logical, given that time is passing, but still.

The overall plan at the moment is to make the carriage house livable, then start on the big house. There's still some carpet to remove over there, and the vanity in the blue bathroom - that has to be done soon so I can return the dumpster - but so far, it's just in a holding pattern for now.

There has been some discussion of renting an apartment due to the relative non-livability of the carriage house at the moment; that's still up in the air, but my sister happens to have a one-bedroom place available within easy bicycling distance and doable (but not terribly practical) walking distance, so it might work out pretty well for everybody. But I still feel that the best to-do list remains to get the carriage house to a nice basic condition, for resale value if nothing else. I've put maybe $1500 into this so far (not including the two dehumidifiers and the air conditioner, all of which can be reused or resold elsewhere). I'm pretty sure that if I didn't have to sell the house within the week, like the bank did when I bought it, I could at this point get a good $25,000 out of it even without getting the rest of the plumbing working. If I finish the carriage house windows and trim and plumb the big house, I figure that's going to go up to at least $30K, maybe even $40K if I'm not in a hurry. So there's very little downside here.

But take heart, Gentle Reader. I'm currently betting it's not going to come to resale.

Tub surround

Now that's a tub surround. It's amazing how much nicer it makes the bathroom look. OK, it draws the eye to the stained bathtub and damaged paint, but it looks like a bathroom instead of that Mexican-prison look.

I also got the vanity set in place (a different vanity, by the way; my wife vetoed the pedestal in favor of a little more storage space in this somewhat storage-space-challenged apartment). The crossbar in the back was, of course, half an inch too low to fit over the hot water supply (or a quarter-inch for the cold), so I had to cut notches into that. Before plumbing it, I want to attach the bowl firmly to the wall, but I'd say the vanity is 40% done.

So the list is definitely getting shorter!

Wednesday, July 8, 2009

Blocked at every turn

Thinking to set one of the new front windows into the frame in place of the board, I unwrapped it and cleared out what remained of the old top sash - only to find that the sill has warped a little, and the right edge of the window is about 1/8" too big to fit into the frame. So I'll have to plane the sill down to get that window in. Disappointing, but I'm still pumped about how nice it's going to look.

Kitchen

That's better.

Tub surround II

Here's the first third of the tub surround. Turns out the back wall isn't particularly close to vertical, so I had to carve a slant into the back of this panel. And I foolishly assumed that one tub surround kit would be sufficient for one tub surround (three tubs of adhesive, one tube of caulk). I used two tubes of adhesive on this one panel, which is one-fourth of the total area of the tub surround.

So this panel took far longer than I'd hoped, and I ran out of adhesive, so that's as far as I got day before yesterday on tub surrounding. My son asked with some apprehension whether the masking tape was permanent. I assured him it just holds the panel on the wall while the glue is setting, and he was greatly relieved.

Note the strip of ugly old adhesive along the right edge. Fortunately, that stuff scrapes off pretty easily.

Anyway, yesterday we shopped a lot for various things required for a household, as opposed to a house, and so no more progress was made on that front. I did start installing the front windows (hoping to get a little breeze into the south side) but it turns out I'm going to have to plane the sill down a little; it's warped slightly, just enough that I can't get the pocket replacement in on the right window. Ah, well. Onwards.

Sunday, July 5, 2009

Tub surround started

Having returned from New York, I spent most of the day standing around in Lowe's and Menard's, waiting for things to be obtained for me (the new front windows, and the tub surround, respectively; the windows do in fact look pretty snazzy with the grid between the panes).

The hard part of the tub surround is complete - getting the old silicone caulk off the tub. That stuff was effective, but was very poorly applied and looked horrible. The new surround will be much better; pictures tomorrow.

Interesting tidbit: from the different colors of glue visible, I can tell you that this will be the third tub surround in this apartment; fourth if you count the original tiles. (The original tiles are cheap plastic, by the way. Slated for replacement sometime.)

Wednesday, July 1, 2009

Bathroom's clean

Which is good, because the family will be at the airport tomorrow. Or, actually, today at this point. The "overall thorough mopping" is also complete. Which leaves oh so much to do.